6.6. Setting up a Mail Server
The goal of this section is to teach the reader how to configure a mail server on EnGarde Secure Linux. You should configure a mail server if you want your machine to be able to send or receive e-mail on the Internet.
By the end of this section the reader will have configured a single mail domain and will be able to send and receive e-mail through their EnGarde Secure Linux machine with other users and machines on the Internet.
6.6.1. DNS Setup
Begin by creating a new domain using the procedure outlined in the previous section "Setting up a Forward DNS Zone". Once you have your forward zone created you need to do the following:
Create a new Address record for "mail.<yourdomain>", pointing mail.<yourdomain> to the IP address of your EnGarde Secure Linux machine.
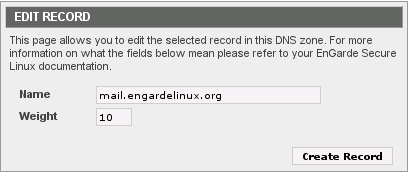
Create a new Mail Server record. Enter "mail.<yourdomain>" in the Mail Server field and enter the number 10 in the Weight field.
For example, if your domain name is engardelinux.org you would enter the following in step 1:

This tells the Internet what IP address the machine mail.engardelinux.org may be found at. Next you need to tell the Internet that mail.engardelinux.org is a mail server:
DNS on your machine is now properly configured for e-mail.
6.6.2. Create a Mail Domain
Log into the Guardian Digital WebTool, click the Services menu, navigate to E-mail Services, and then click the SMTP Server Management link. Choose Virtual Mail Domains from the Module menu and you'll see a section like the one in Figure 6-11.
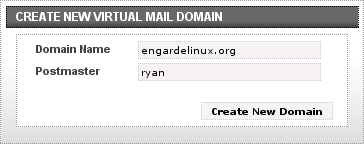
Enter the name of the domain you want receive mail for in the Domain box and optionally enter an e-mail address or a local username in the Postmaster box, then click the Create New Domain button.
 | The optional Postmaster account receives all undeliverable mail. You can think of this setting as a "default recipient" -- if somebody tries to send an email to nosuchuser@engardelinux.org and nosuchuser is not defined as a valid mail recipient, the mail will go to the Postmaster if one is defined. |
You have now successfully created a mail domain and the next step is to add recipients to it. You should see the domain you just created listed in the Active Virtual Mail Domains section as illustrated in Figure 6-12.

Clicking on your new domain will launch a popup shown in Figure 6-13.
| If you are using a web browser which implements pop-up blocking (such as Mozilla or Firefox) you may need to add an exception for the machine that is running the WebTool. If you click your mail domain and nothing happens make sure you are permitting pop-ups! |

The example above has two recipients defined: pete and dave. The Postmaster is ryan.
Adding a Recipient
Enter a username in the Address box and enter a recipient address (or local username) in the Recipient box, then click the Create New Address button.
Deleting a Recipient
Click the Delete button next to the recipient you want to delete.
Updating a Recipient
Update the Recipient field of the recipient you want to edit then click the Update button next to it.
Changing the Postmaster
Change the Recipient of the Postmaster address then click the Update button next to it.
Deleting the Mail Domain
Click the Delete this Domain button at the top of the page.
Your mail server is now configured.